Showing posts with label Angular. Show all posts

Monday, 19 February 2018

When we want to communicate from component class to template ,we can use interpolation which use the {{ expression }} to render the bound value to the component’s template.

Step 1 : Create an angular 5 project  from here https://programmergangtuts.blogspot.com/2018/02/creating-first-angular-5-project.html and copy and paste the following code in src->app->app.component.ts 
import { Component } from '@angular/core';

@Component({
  selector: 'app-root',
  templateUrl: './app.component.html',
  styleUrls: ['./app.component.css']
})
export class AppComponent {
  firstName:string="Mani"; //defining first name field in typescript
  lastName:string="Rai";  //defining last name field in typescript
  getFullName():string //method returning first name and last name
  {
    return this.firstName +" " +this.lastName;
  }
}
Step 2 : paste the following code in src->app->app.component.html 
Full Name : {{getFullName()}} //interpolation

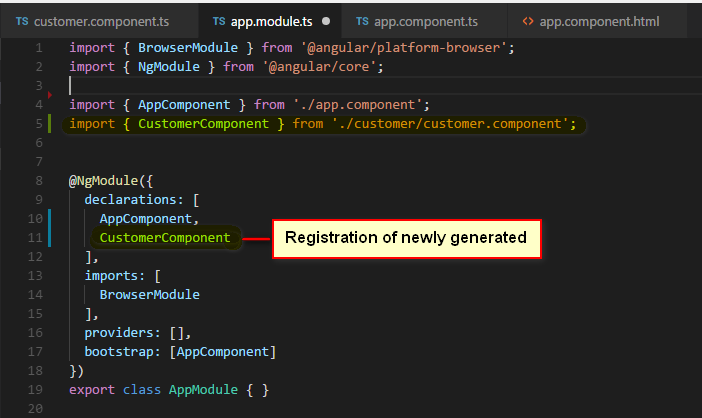
Step 3 :  app.module.ts is root module which is shown below and AppModue is route modules which bootstraps and launches the angular application.


Step 4 : Go to View -> Integrated terminal then terminal will open .


Step 5 : type 'ng serve -- open ' in open terminal in step 5 


Step 6 : Output is shown below :

 Happy Coding !!!
In this article ,I will show you about nested component in angular 5.

Step 1 : First create the angular 5 project https://programmergangtuts.blogspot.com/2018/02/creating-first-angular-5-project.html .Go to cmd and run as administrator->navigate to your project folder and in project folder type 'ng g c customer' .Here AngularDemo is our project which was previously created and shown below :


Step 2 : When you run above command ,customer folder and necessary files are created inside it which is as shown below :


Step 3 : When you run the above command ,it will automatically register the newly generated component inside declarations array of @NgModule which is shown below :


Step 4 : Go to src->app->customer->customer.component.ts and paste the following code ;
import { Component, OnInit } from '@angular/core';

@Component({
  selector: 'app-customer',
  templateUrl: './customer.component.html',
  styleUrls: ['./customer.component.css']
})
export class CustomerComponent implements OnInit {
  customerName:string;
  customerCode:string;
  constructor() { 
    this.customerName="Manichandra Rai";
    this.customerCode="1001";
  }

  ngOnInit() {
  }

}
Step 5 : Go to src->app->customer->customer.component.html and paste the following code :
<table>
  <tr>
    <td>Customer Code</td>
    <td>Customer Name</td>
  </tr>
  <tr>
    <td>{{customerCode}}</td>
    <td>{{customerName}}</td>
  </tr>
</table>

Step 6 : Go to src->app->customer->customer.component.css and paste the following code :
table{
    color:black;
    font-family: Arial, Helvetica, sans-serif;
    font-size: large;
    border-collapse: collapse;
}
td{
    border: 1px solid black;
}
Step 7 : Go to src->app->app.component.ts and paste the following code :
import { Component } from '@angular/core';

@Component({
  selector: 'app-root',
  templateUrl: './app.component.html',
  styleUrls: ['./app.component.css']
})
export class AppComponent {
  title = 'Customer Info.';
}
Step 8 : Go to src->app->app.component.html and paste the following code :
<!--The content below is only a placeholder and can be replaced.-->
<P class="customstyle">
  {{title}}
</P>
<p><app-customer></app-customer></p>

Step 9: Go to src->app->app.component.css and paste the following code :
.customstyle{
 font-weight:bold;
 color:red;
font-style:italic;
text-decoration: underline;
font-size: x-large;
}
Step 10 : Go  to cmd  and type 'ng serve --open' and hit enter and you will get the following output :

Happy Coding !!!

Saturday, 17 February 2018

Component is a class with a template (User interface) and decorator (decorator is function that is invoked with a prefixed @symbol), which have the binding logic to bind the UI and the model. We can say component is binder/view model or binding code.

A component must belong to an NgModule in order for it to be usable by another component or application.Every Angular app has at least one NgModule class, the root module, conventionally named AppModule.
Most important properties of @NgModule are:

declarations: Registers particular components within this module

bootstrap: Tells the module which component to bootstrap

imports: Imports other modules into this module

Providers: creators of services that this module contributes to the global collection of services; they become accessible in all parts of the app. These providers are for services. whatever you have services , that services should be add in the provider field. providers will tell to angular how to inject a service.
app.module.ts

Note : AppModue is route modules which bootstraps and launches the angular application.


Component decorator @Component must have the selector and template and component class must add export. then only it will available in the project. we need to add ‘export’ keyword before the component class.
app.component.ts


Selector :selector is name which is used in our view like html tag.css selector that identifies this component in a template
index.html

template: we can write html code in the template and we can write multi line code using backtick character.
app.component.ts


TemplateUrl :url to an external file containing a template for the view
app.component.ts

styleUrls: list of urls to stylesheets to be applied to this component's view.
app.component.ts
app.component.css

styles: inline-defined styles to be applied to this component's view.
app.component.ts

bootstrap – the main application view, called the root component, that hosts all other app views. Only the root module should set this bootstrap property.
Main.ts:
The main entry point for the application.This file contains the code to bootstrap the application root module.(i.e. AppModule)
import { platformBrowserDynamic } from '@angular/platform-browser';

import { AppModule } from './app/app.module';

platformBrowserDynamic().bootstrapModule(AppModule);
Note : We can add component  by typing ng g component ‘component name’ or ng g c ‘component name’ in command prompt.

Friday, 16 February 2018

In this article, I will explain How to Create Project in Angular 5.

Step 1: Download nodeJs from https://nodejs.org/en/ and install it.

Step 2 : After installing nodeJs .Open cmd by run as administrator and type node -v for node version check as shown below :
Step 2: Type npm -v  for npm version check as shown below :
Step 3 : Install typescript using  "npm install typescript -g”.
The “-g” command says that you can execute typescript command from any folder.Typescript is a javascript open source framework so the best way to get it installed is by using “npm”.

Step 4 : Type tsc -v for typescript version check
Step 5 : Type npm install -g @angular/cli as shown below.The Angular CLI is a command line interface tool that can create a project, add files, and perform a variety of ongoing development tasks such as testing, bundling, and deployment
Step 6 : Type ng -v for checking Angular  CLI version
Step 7 : Go to location where you want to create project .Here i have  i want to create project inside DIT folder of my E drive  so Type ng new AngularDemo(Project Name) and hit enter as shown in below :It will some time...
Step 8 : After that Type cd AngularDemo(Porject name)
as shown below :
Step 9: Type ng serve --open as shown below :
Step 10 : Output is as shown in below and this is our first angular  app

Step 11 : Press ctrl+c and type y and enter as shown below :
Step 12 : Download and install visual studio code from https://code.visualstudio.com/download for editor.We can do angular in simple notepad but here we use visual studio code which helps us with all automation for HTML, JavaScript, Typescript and so on.
Step 13 :  After installation of visual studio code .go to cmd and open as administrator and type code .(dot)  .It will open your angular project in visual code editor.
Angular project in visual studio code 
Step 13: Now go to src->app->app.component.ts and change  title to "Hello Angular". as shown below 

Step 14 : Now go to src->app->app.component.html and change <P>{{title}}</P>
as Shown below

Step 15 : Now again go to cmd and open run as administrator and type ng serve --open  again
Step 16 : Now new output is as shown below and our angular app run on 4200 port but we can change this port.

Categories

Powered by Blogger.

Followers

Translate

Currency Converter

Exchange Rate

Featured post

Interpolation in angular 5

When we want to communicate from component class to template ,we can use interpolation which use the { { expression }} to render the bound...

Popular Posts

My Facebook Page