
Introduction:
In this article, I will explain How to implement paging using PagedList library in Asp.net MVC.
Step 1: Open visual studio à Go to File menu àselect New à Project like as shown below

Step 2: Now from web templates select Asp.Net Web Application (.NET Framework) and give name (PagingInMVC) to the project and click OK button like as shown below.

Step 3: Once we click OK button new template will open in that select MVC from templates like as shown below

Step 4:Our project structure will be like as shown below

step 5: Delete the HomeController already present in the project because we will create it from scratch as shown below

Step 6: Delete the Home folder inside Views folder as shown below

Step 7 : Design database and table like shown below :

Step 8 Click on Models -> Add ->New Item as shown in below

Step 9: Select Data -> ADO.NET Entity Data Model and give name PagingModal and click add as shown below

Step 10: Select EF Designer from Database and click next as shown below

Step 11 : Enter server name (local) or your live server name and select database name and test the connection and click Ok as shown below

Step 12 : Click Next as shown below

Step 13 : Select Next as shown below

Step 14 : Tick check box like as shown below and click finish

Step 15 : Our models folder looks like as shown below

Step 16 :
The DummyDBEntities class is derived from
DbContext class and contains DbSet<TEntity> properties of tbl_Employee type. It also overrides OnConfiguring and OnModelCreating methods. We must create an instance of DummyDBEntities to connect to the database and save or to retrieve tbl_Employee data. 
Step 17 Our model class looks like as shown below.In database first approach this code is automatically generated by visual studio from database table.

Step 18: Connection string is auto generated in database first approach which is shown below

Step 19 : Right click on controller folder ->Add ->Controller as shown below

Step 20 : Dialogue box will open once you click on controller and select MVC 5 controller - Empty and click Add as shown below

Step 21 : Rename as HomeController and click Add button.Don't remove controller after Home because it is convention of MVC and MVC works on convention.

Step 22 : Now it is time to install PagedList library through Nuget package manager and for this right click on Project or Solution -> Manage Nuget Packages as shown below

Step 23 : Type PagedList in search bar and install PagedList.MVC and PagedList automatically install as shown below

Step 24 : Replace your HomeController code with following code
 using System;
 using System.Collections.Generic;
 using System.Linq;
 using System.Web;
 using System.Web.Mvc;
 using PagedList;
 namespace PagingInMVC.Controllers
 {
   public class HomeController : Controller
   {
     DummyDBEntities dummyDBEntities = new DummyDBEntities();
     // GET: Home
     public ActionResult Index(int ? page,int pageSize=2)
     {
       int pageNumber = page ?? 1;
       var onePageOfEmployees = dummyDBEntities.tbl_Employee.ToList().ToPagedList(pageNumber, pageSize);
       if(Request.IsAjaxRequest())
       {
         return PartialView("_EmployeeGrid", onePageOfEmployees);
       }
       return View(onePageOfEmployees);
     }
   }
 }
Step 25 : Rebuild the project as shown below

Step 26 : Right click inside Index action and dialogue box will open and choose Add View.

Step 27 :Select List from template,model class,data context class and layout page and click on Add as shown below

Step 28: Again go to Nuget package Manager and install
Microsoft.jQuery.Unobtrusive.Ajax as shown below
Step 29 : Go to Views->Home->Index.cshtml and replace this code
@using PagedList
@using PagedList.Mvc
@model IPagedList<PagingInMVC.Models.tbl_Employee>

@{
    ViewBag.Title = "Index";
    Layout = "~/Views/Shared/_Layout.cshtml";
}

<h2>Index</h2>

<p>
    @Html.ActionLink("Create New", "Create")
</p>
<div id="employee-grid">
    @{
        Html.RenderPartial("_EmployeeGrid", Model);
    };
</div>
@section scripts{

<script src="~/Scripts/jquery.unobtrusive-ajax.min.js"></script>
    }
Step 30: Views -> Home->Right click on Home->Add->Add View->select create as partial view check box and add partial view with empty template and paste the following code
@using PagedList
@using PagedList.Mvc
@model IPagedList<PagingInMVC.Models.tbl_Employee>
<table class="table">
    <tr>
        <th>
            Employee Name
        </th>
        <th>
            Salary
        </th>
        <th></th>
    </tr>

    @foreach (var item in Model)
    {
        <tr>
            <td>
                @Html.DisplayFor(modelItem => item.EmployeeName)
            </td>
            <td>
                @Html.DisplayFor(modelItem => item.Salary)
            </td>
            <td>
                @Html.ActionLink("Edit", "Edit", new { id = item.EmpID }) |
                @Html.ActionLink("Details", "Details", new { id = item.EmpID }) |
                @Html.ActionLink("Delete", "Delete", new { id = item.EmpID })
            </td>
        </tr>
    }

</table>
@Html.PagedListPager(Model, page => Url.Action("Index", new { page=page}),PagedListRenderOptions.EnableUnobtrusiveAjaxReplacing(new AjaxOptions() {HttpMethod="GET",UpdateTargetId= "employee-grid" }))
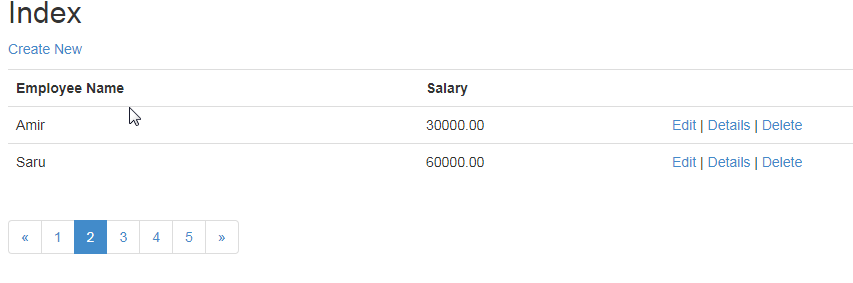
Step 31 : Run your project and output is shown below
Happy Coding !!!


How would you send parameterized query to this partial view? Say you only want employees who started work within a given date range? Thanks!
ReplyDeletesimply superb,mind blowing, i will share your blog to my friends also
ReplyDelete.NET Online Course Hyderabad
Smm panel
ReplyDeletesmm panel
iş ilanları
instagram takipçi satın al
https://www.hirdavatciburada.com
beyazesyateknikservisi.com.tr
servis
Jeton Hile İndir
uc satın al
ReplyDeleteen son çıkan perde modelleri
yurtdışı kargo
lisans satın al
nft nasıl alınır
minecraft premium
özel ambulans
en son çıkan perde modelleri